
Whether you want to improve the quality of your Zoom calls or record your voice for a YouTube video, a podcast or something else, you’ll want to ensure you’re getting the best audio from your microphone. There are various ways to do this, from simple tweaks to your environment all the way up to investing in high-quality equipment. We show you a few easy ways to make your vocals sparkle.
Pop on some headphones
By far the easiest way to improve your sound quality on video calls is to plug in some headphones to your PC. The main reason for this is that it eliminates the sound of the other people on the call coming out of your speakers and going straight into your microphone and back to everyone listening. This is one reason why you sometimes get echos or ‘feedback’ on Zoom calls.
It’s almost impossible to get really good audio when you can hear the garbled voices of other people demanding that ‘Jackie Weaver, you have no authority here’ in the background.
Another advantage of using headphones is that many come with built-in microphones, which could be better quality than the one built into your laptop.
Reduce the noise in your room
Along the same lines, you’ll also want to cut out any other extraneous noises that might be spoiling your audio. So, make sure that you turn off the TV or radio, close any open windows, ask other family members not to play music loudly or have shouting matches during the call.
Also turn off any fans or air conditioning in the room, bribe the dog with a juicy bone and oil your squeaky office chair.
If you don’t have control over whatever’s making noise, consider using an app (for Windows and macOS) such as Krisp. It’s free for ‘professionals who occasionally work remotely’, which means you get 240 minutes of use per week.
Use a dedicated microphone
Let’s face it, most microphones and webcams that come as standard in laptops are pretty basic. Adding a dedicated stand-alone microphone can instantly give your audio a huge leap in quality. You don’t have to spend hundreds of pounds on professional level microphones to improve your existing setup, as a cheap USB microphone can at least allow you to speak directly into it, which cuts down the natural reverb of the room that you get when talking to your laptop or PC at a distance.
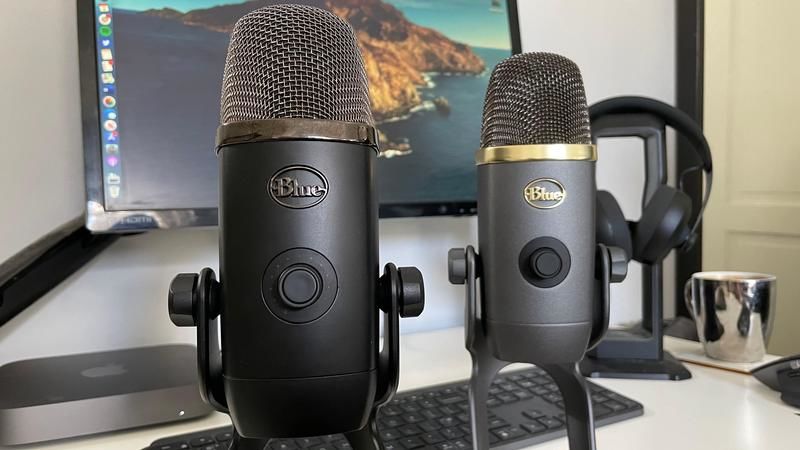
We’ve already put together a guide to some of the best microphones for streaming and podcasting, but if you feel they are too expensive, then something like the Ture Plug and Play USB microphone could be a good option, costing £23 on Amazon UK at the time of writing. US customers can opt for the slightly flashier looking EIVOTOR plug & play desktop USB microphone that will set them back $15.99 from Amazon US.
One thing to note about more expensive microphones is that they generally come in two types: dynamic and condenser. As a rule of thumb, condensers will give you a richer sounding voice but pick up more background noise, while dynamic mics focus on capturing sounds directly in front of them, so you end up with less white noise but miss some of the ambience in a room. You can get excellent results from both, but you’ll need to consider how loud your environment is when selecting a new microphone.
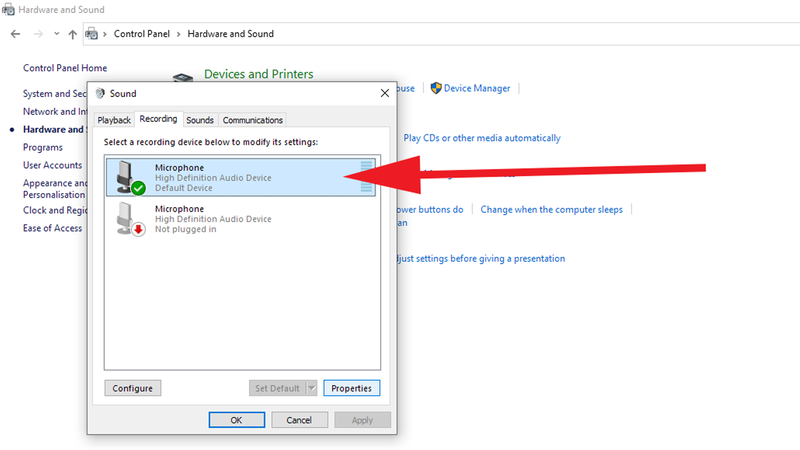
Adjust the microphone settings in Windows
Windows has a few different settings that you can use in windows to adjust the quality of your audio. They are easy to use once, of course, you know where they are.
Open the Start menu and search for Control Panel. Select the top result then navigate to Hardware & Sounds > Sound and select the Recording tab.
In here you’ll see settings for microphones that are either attached or built-in to your PC. Highlight the one with a tick next to its name, then click the Properties button.
Select the Levels tab and check to see how high the input is currently set. An important element is the Microphone Boost which increases the signal strength via software. But, if you have too much volume coming in, it can cause digital distortion that will reduce the quality of your audio.
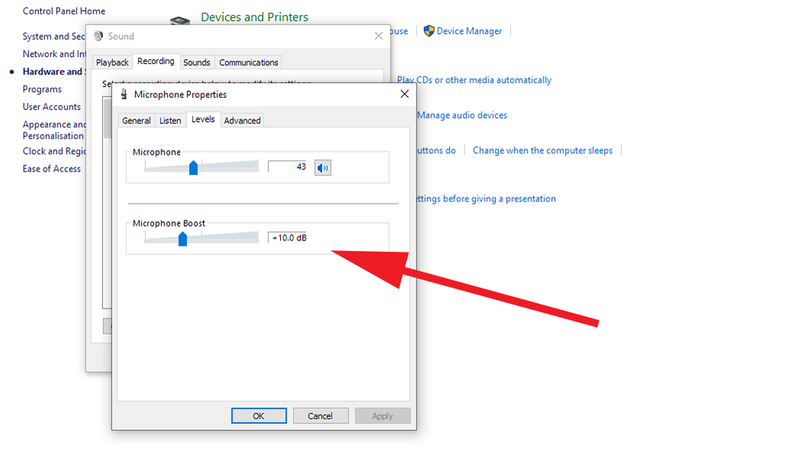
Try adjusting both the Microphone and Microphone Boost settings to see if it improves your results. Ideally you’ll want to raise the level of ‘natural’ signal coming in (via the Microphone option), while reducing the software boosted audio.
If you also see a tab entitled Enhancements, then you can explore the setting in here too, paying particular attention to the Noise Suppression option, which can be quite helpful in cleaning up a signal.
Hopefully, with all of these tweaks at your disposal, you’ll sound loud and clear the next time you fire up your video calling or audio recording software on your PC.